
By William P. Hale, EAA 350089
Our Van’s RV-8, Metal Mistress, was built at home in Lake Geneva, Wisconsin, and is now hangared at Door County Cherryland Airport, in Sturgeon Bay, Wisconsin.
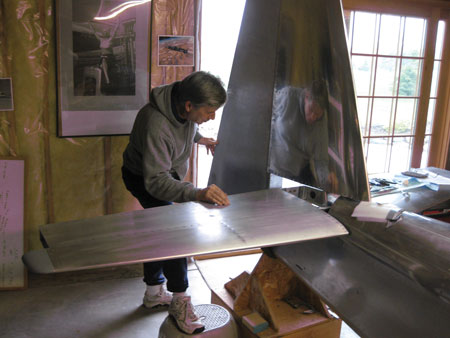
As a Vietnam War veteran and a student of military aviation history, the paint scheme I chose and completed is polished aluminum/black/white. The goal was a military tribute loosely based on a D-Day theme, without being garish or disrespectful.

How this project started: I took a familiarization flight in an RV-8 at Van’s factory in 2005 and was extremely impressed with the handling and performance qualities of the airplane. The tail kit was purchased shortly thereafter and completed in 2006. Several years passed without any commitment to complete the rest of the airplane. In the meantime, I started another tail kit from a competing aircraft kit manufacturer. Still, in the back of my mind I always wanted to build the RV-8. In 2012, I just happened to be surfing some RV sites when I found an RV-8 quick-build kit available through an estate sale fairly close to our home. The kit had been unpacked and inventoried, but no work completed. The fuselage had been sitting on cardboard for the last 10 years resulting in substantial corrosion to the bottom skins. There was additional damage to one of the wings, and I knew those skins would have to be replaced as well. As it turned out, thankfully, there was no internal damage to the fuselage or the wings. A deal was struck for the kit; we boxed it up and rented a U-Haul to bring it home. Although this was not how I envisioned starting the build, I felt we could work through the above-mentioned issues.
As this was not my first homebuilt project (I had previously completed a Kitfox Model 3 in 1997), I understood the commitment. Our RV-8 took 13 years to complete from start to finish and more than 3,000 man-hours, hence the airplane qualified as a bona fide Metal Mistress. As an airline captain frequently away from home and the project, I planned the work on layovers and then worked the plan at home. With the cooperation of my family, I dedicated a minimum of 10-15 hours per week to the task. Once retired, I had considerably more time to devote as well as a strong commitment to finish the project.
Some statistics: The fuel capacity of our aircraft is 42 U.S. gallons. It is powered by a Superior IO-360, 180-hp engine fitted with a 72-inch blended Hartzell constant-speed propeller. Fuel burn is 10.6 gph at 70 percent power and produces a pleasing 170 knots true airspeed (196 mph).

The instrument panel and cockpit layout, which I designed, is IFR certified with a Garmin electronic flight instrument system (EFIS), including ADS-B In and Out, and a fully integrated Garmin autopilot.
The only modifications to the airplane (other than the normal myriad of options and accessories that accounted for a considerable amount of the total time required for the build) were the top cowling attachment fittings and a tailwheel upgrade.
Some of the safety equipment installed includes a stall warning system, full Hooker Harnesses, dual controls front and back with the exception of brakes in the rear seat, and a heated pitot tube. Of course there are nav, strobe, landing, and taxi lights and an emergency locator transmitter.
Even though I have an extensive background in tailwheel and high-performance aircraft, and I was going to do my own Phase I flight testing, I elected to receive 10 hours of dual instruction from an instructor recommended by the factory in a similar RV model to prepare me for that critical first flight. I would highly recommend and encourage anyone preparing to do their own flight testing to complete a factory-sponsored training program, if available, or to get training from an instructor qualified in your model aircraft. I felt this transition training was invaluable. As the aviation axiom goes: Speed, altitude, and training is life!
The first flight was on September 15, 2019. The flight was mostly uneventful (yes, my heart rate was elevated) except for a minor propeller underspeed on takeoff that was corrected before the next flight. That first flight lasted one hour and 30 minutes. Total time to date: 100 hours.
All during the build I felt it was vitally important to keep a vision of the completed project in mind as well as looking forward to what I wanted the airplane to be and what I wanted it to eventually do for us. While working on our project, I found a good remedy for “builder’s block” was to quit for the day and use any available resources — kit techs, EAA technical counselors, builder forums, etc. — to help get me back on track. I kept trying to remember, this is supposed to be educational and fun!
Many educational opportunities are available through EAA to get a builder comfortable and confident to start a project. In my case, I took a SportAir sheet metal workshop and an aircraft electrical workshop. Even though I have an electrical engineering and aircraft systems background, I found the courses very helpful and referred to the provided course material often.
An aircraft project like the RV-8 takes years and dynamically changes as it goes, and it’s not a weekend project. That’s not a bad thing. There are few things more rewarding than flying your completed aircraft for the first time. With a positive vision of the goal, and the proper attitude, you can bring your dream to fruition. There’s always someone you can talk to or reach out to. Use all your available resources. Be a lifelong learner.
A special thanks to friends and family without whose support this project could not have been completed.